In Solid GEAR, we have been building multi platform applications with Xamarin for the last few years, since we discovered it was an amazing platform to help developers on dealing with apps needing to reach Android and iOS users. Nothing new under the sun so far.
In my opinion, when it made the difference and hence it became a standard solution for us was when we internalized decoupled architecture, MVVM pattern, and we used them to provide our apps with offline by default functionalities.
Direct consequences of these practices have been quicker developments and more reliable and more robust final products.
Furthermore, Xamarin has become, by using nuget, a very good collaboration platform where community share their standardized developments, in the form of plugins, so that other developers can take advantage of them. All this under MIT license.
According to this Xamarin’s nature, from SG we want to share with you some of the solutions we find to provide our customers with the best possible UX, at the lowest possible cost. We open here what we can call “SG Xamarin diaries”.
Working with Maps in Xamarin Forms
If you plan to add some map to your Xamarin app you will probably try in a first attempt using Xamarin.Forms.Maps plugin.
That’s ok, but it only allows you to set some map region with a central position, create some static pins and nothing else.
These features are explained here: https://developer.xamarin.com/guides/xamarin-forms/user-interface/map/ so it’s not worth to explain it over again.
So, what If I want to allow the user to interact with the map? Do I have to go through the dark and cold custom renderer way?
Custom renderers are great, but don’t duplicate efforts is a good rule in software development. Here is where we found TK.CustomMap: https://github.com/TorbenK/TK.CustomMap Extended Map Control for Xamarin.Forms.Maps.
This is an awesome community effort to provide Xamarin apps with advanced map functionalities. Let’s say:
- Touch events
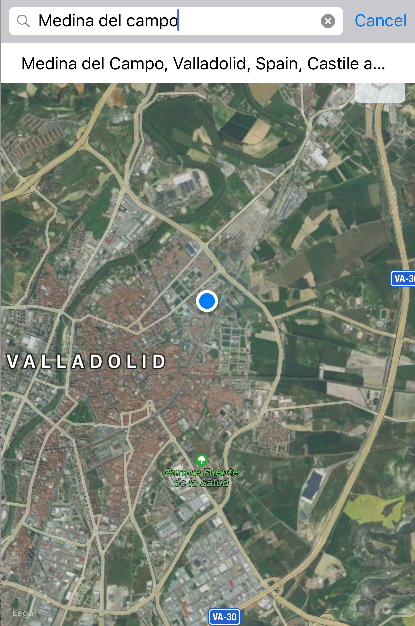
- Address search bar
- MVVM compliance
- UI responsive
- Multiplatform
And it perfectly fits what we needed. We need to provide user with a map and a search bar. Once the user searches for an address, the map should move there and allow the user to pick a piece of land where he wants to place a pin.
Let’s start!

In a new xaml page, let’s say MapPage.xaml, add a new RelativeLayout:
<ContentPage.Content>
       <RelativeLayout x:Name="relativeLayout" VerticalOptions="FillAndExpand" />
</ContentPage.Content>
In this case, we do almost all initialization work in code behind (it’s the recommended way in author’s’ documentation):
public MapPage(NewPlotViewModel vm)
{
            InitializeComponent();

            ViewModel.NewPlot = vm;

            var madrid = new Position(40.4381307, -3.8199654);

            var map = new TKCustomMap();

            map.IsShowingUser = true;
            map.HasZoomEnabled = true;
            map.MapType = MapType.Hybrid;
            map.SetBinding(TKCustomMap.MapLongPressCommandProperty, "MapLongPressCommand");
            map.SetBinding(TKCustomMap.MapCenterProperty, "MapCenter", BindingMode.TwoWay);
            map.SetBinding(TKCustomMap.MapRegionProperty, "MapRegion", BindingMode.TwoWay);
            map.SetBinding(TKCustomMap.CustomPinsProperty, "Pins", BindingMode.TwoWay);
            map.IsRegionChangeAnimated = true;

      ViewModel.MapCenter = madrid;
      ViewModel.MapRegion = MapSpan.FromCenterAndRadius(madrid, Distance.FromKilometers(2));

            var autoComplete = new PlacesAutoComplete(true)
            {
                ApiToUse = PlacesAutoComplete.PlacesApi.Native,
            };

            autoComplete.SetBinding(PlacesAutoComplete.BoundsProperty, "MapRegion", BindingMode.TwoWay);
            autoComplete.SetBinding(PlacesAutoComplete.PlaceSelectedCommandProperty, "PlaceSelectedCommand");

            relativeLayout.Children.Add(
          map,
          Constraint.RelativeToView(autoComplete, (r, v) => v.X),
          Constraint.RelativeToView(autoComplete, (r, v) => autoComplete.HeightOfSearchBar),
          heightConstraint: Constraint.RelativeToParent((r) => r.Height - autoComplete.HeightOfSearchBar * 2),
          widthConstraint: Constraint.RelativeToView(autoComplete, (r, v) => v.Width)
);


            relativeLayout.Children.Add(
                autoComplete,
                Constraint.Constant(0),
                Constraint.Constant(0)
            );
}
This little piece of code creates all the magic for us. This initializes two things: Map itself and Autocomplete address search bar. We tell search bar to use native api. There are other options but it seems to be the less complicated of all. Anyway, for Android we’ll need a special geo api key we can get from developer console and set it up in AndroidManifest.xml:
<application android:label=”MyApp">
       <meta-data android:name="com.google.android.geo.API_KEY" android:value="{API_KEY}" />
</application>
Notice that map properties are binded to view model (we said it was MVVM compliant). Specifically we bind MapRegion and MapCenter properties to the same called properties on the view model.
In ViewModel, we take advantage from Geolocator plugin: https://github.com/jamesmontemagno/GeolocatorPlugin to get the current location and to position initially the map on that location:
private async Task GetCurrentLocationAsync()
{
               var position = await geolocator.GetPositionAsync();

               if (position != null)
               {
                   MapCenter = new Position(position.Latitude, position.Longitude);
                   MapRegion = MapSpan.FromCenterAndRadius(MapCenter, Distance.FromKilometers(2));
               }
}
And also, as advanced feature, to provide iOS Map with the “take me to my current position” button, so typical in maps from google.
When the user searches for an address and selects some of the suggestions we modify MapCenter property in the ViewModel with the place returned by search:
private async Task SelectPlaceAsync(IPlaceResult place)
{
           if (Device.RuntimePlatform == Device.Android)
           {
               var prediction = (TKNativeAndroidPlaceResult)place;

               var details = await TKNativePlacesApi.Instance.GetDetails(prediction.PlaceId);
               if (details != null)
               {
                   MapCenter = details.Coordinate;
               }
           }
           else if (Device.RuntimePlatform == Device.iOS)
           {
               var prediction = (TKNativeiOSPlaceResult)place;

               if (prediction != null)
               {
                   MapCenter = prediction.Details.Coordinate;
               }
           }
}
What provokes automatically the change of position in the map to the searched place.
Once there, by longpressing a place in the map we can pick a position and translate it to a map’s pin:
private async Task SelectPositionAsync(Position position)
{
           var pin = new TKCustomMapPin
           {
               Position = position,
               Title = string.Empty,
               ShowCallout = false
           };
           Pins.Clear();
           Pins.Add(pin);
}
Summary
By using TK.CustomMap in a few simple lines of code we can build a fully functional map with an autocomplete search bar, longpress recognition and advanced functionalities to improve UX in our Xamarin multiplatforms apps.
Related Articles
https://ahorasomos.izertis.com/solidgear/cross-platform-development-xamarin
https://ahorasomos.izertis.com/solidgear/hybrid-apps-development-with-ionic


