Why you should consider bridging Swift – Objective-C?
If sometimes you have ever wondered about the truth about complete interoperability between Swift and Objective-C in the same project..
Maybe you have an old iOS app based in Objective-C and you have raised if you start to include new classes in Swift..
And you too want the code be more accessible for new iOS developers..
I just have to say GO FOR IT and be READY TO FIGHT!
I am not going to tell you that all will work magically at first.. sometimes it can turn into a little nightmare, nonetheless, with conviction and step by step, will be worth it and you will start to refresh your app.
Read on to find some tips to take into account and make you have a smoother transition in the process of bridging Swift – Objective-C classes.
Import Swift Headers and class in your Objective C file

Auto generated Swift headers files
These files that automatically generates Xcode, are the ones that make the magic of bridging Swift classes and allow us to use them in Objective C classes.
Do not look for them inside the project, they are not local.
An important consideration here is to know the exact name of these files to import them.
These files have a name as a prefix, the wording “Swift” as suffix and the header extension “.h”. ex: Name-Swift.h
The prefix name is not the name of your project (or targets if you use extensions too), it is the product module name.
Product module name
Is the name that uniquely identifies each of your targets. It can match with your target name but may not.
You can check your exact product module name going to the settings of each of your targets and search for Product module, it will be under the Packaging section, make sure you have the option show all selected.
Swift Bridging header files
Now that we know the exact name, we need to import them in every Objective-C class that we want to use some Swift classes in
#import <ProductModuleName-Swift.h>
Import Swift class
Below import the Swift header file in your Objective-C file, you need to import your Swift class.
@class SwiftClassName;
Clean and relaunch the project

You better learn these shortcuts because you are going to need them a lot.
shift+cmd+k Clean
shif+cmd+b Analyze
cmd+r Run
If you keep getting some errors bridging Swift – Objective-C classes such as: cannot find the Swift header file, or trying to use a Swift class property and does not find it or cannot use some Swift class because does not know the selector…, check also following tips.
Swift class definition @objc
Make sure your Swift class you are trying to use has the prefix @objc and inherit from NSObject
Clue, try add also function as public, and make sure you do not have any error in your Swift class.
Project build and compiler settings
Check Defines module project build settings
In your project settings look for “Defines Module” under Packaging section and make sure it is enabled

Generated Header name in compiler settings
Check that the header name in the Swift compiler setting of each of your targets are the correct ones.
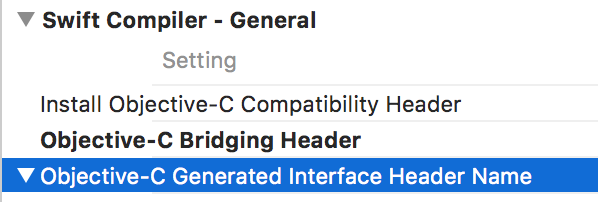
You can use a parameter as in following image

Bridging Header name in compiler settings
This is less important for this use case in which we want to use the Swift Class in an Objective-C Class and not the other way round. We will talk more deep about this in other post.
Build Errors
Are you in a loop? Do not know what is wrong? What Xcode point out as a failure should be right?
Comment your compiled error lines, clean and build again to let maybe the real problems appears and be detected by the compiler.
The error could be the result but not the cause of the issue.
Conclusions

Clean, analyze and build once and again to force regenerate the bridging Swift – Objective-C file after any change.
And patience .. sometimes take a while that Xcode be aware.
If your bridging file was correctly generated you can navigate to it through the import file name and check if the properties you expected are there.
If you still have some issues and for more information check also the troubleshooting tips in the Apple documentation guides.
I really hope you find these tips useful.
In other post we will keep talking about more tips to bridging some properties from Swift to Objective-C and the other way round, using Objective-C classes in Swift ones.
Now you are ready to start including the new features of iOS 11 in your app, take a look to this post that analyze the new features included on iOS 11
Have you already fight bridging Swift – Objective-C classes? Leave us your insights!


I have done import of swift file into objective c file. but i am not able to alloc init to my swift file.
Example:
MySWiftFile *sf = [[MySWiftFile alloc]init];